 |
|
|
|
|
|
|
|
|
|
|
|
|
|
|
|
|
|
|
|
|
|
|
|
|
|
|
|
|
 |
|
|
|
|
|
|
|
|
|
|
|
Cable Reheading Made Simple (After GOI)
|
|
|
|
|
|
|
|
|
|
|
|
1-7/16 Inch O.D. Single Conductor Cone Type Cablehead
|
|
|
|
|
|
|
|
|
 |
|
|
|
|
|
|
|
|
FIGURE 1
STEP 1
Before starting the reheading procedure, check the cable for continuity and/or a short circuit. Remove the contact (teardrop) sub assembly from the cablehead and check for a possible short circuit by placing one ohmmeter probe on the sub body and the other on the banana plug or brass terminal nut. If shorted, disassemble and correct the shorted condition.
STEP 2
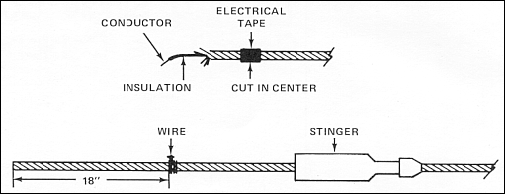
Prepare the cable by putting four wraps of common black vinyl electrical tape on the cable at the point to be cut. Using an impact type cable cutter, cut the cable in the center of the electrical tape. Remove the remaining electrical tape from the newly cut cable end.
STEP 3
Slide the cablehead stinger (fishing neck) onto the cable to a position about ten feet from the cable end; failure to do so will later cause much wailing and gnashing of teeth.
STEP 4
Put four wraps of stove pipe wire (soft iron wire) 18 inches from the cable end and secure it by twisting the two ends together with a pair of pliers. Clip off the excess wire leaving 1/4 inch of twist (see Figure 1).
|
|
|
|
|
|
|
|
|
 |
|
|
|
|
|
|
|
|
FIGURE 2
STEP 5
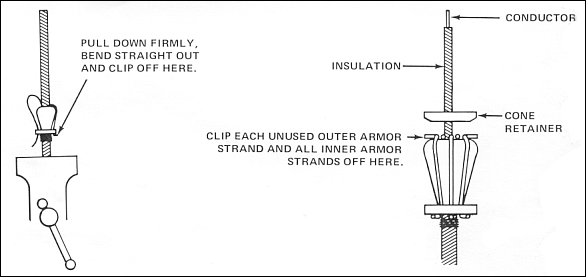
Lightly clamp the cable in a bench vise with the stove pipe wire about three inches above the vise jaws. Slide the cablehead (rope socket) cone onto the cable until it firmly contacts the stove pipe wire (See Figure 2).
STEP 6
Refer to the Cable Properties Table to determine the number of outer armor wire strands to be wrapped around the cone to establish the desired "weak-point capacity", that is, the number of pounds of pull required to pull the cable out of the cablehead. For example: If you have a 5/16 inch Rochester cable and desire a weak-point capacity of about 2,500 pounds pull-out, you must wrap only six (6) of the outer armor strands around the cone (6 x 426 = 2,556).
STEP 7
Grip one of the outer armor strands with a pair of pliers, and while holding the cone with one hand, firmly bend the strand around the rounded part of the cone; then pass the strand through the nearest hole at the lower end of the cone and pull it down firmly with the pliers. Next, bend the strand straight out from the cone and clip it off flush with the side of the cone (see Figure 2). Repeat this procedure, skipping strands so as to evenly space the number of strands selected in Step 6, until all of the required number of strands have been wrapped and passed through the appropriate holes and clipped.
STEP 8
Bend the remaining outer armor strands down (but not around the cone) and clip them off flush with the upper rounded edge of the cone.
STEP 9
Bend all the inner armor strands down and clip them off in the same manner as in Step 8 (see Figure 2). At least one authority urges that at a minimum three of the inner strands should be terminated in the cone for "torque control" to prevent premature cable failure at the top of the cablehead from differential armor rotation. Any inner strands used must be taken into account in the weak-point calculation discussed in Step 6 above.
|
|
|
|
|
|
|
|
|
 |
|
|
|
|
|
|
|
|
FIGURE 3
STEP 10
Remove the cable from the vise and slide the stinger over the cone, making sure it seats properly in the stinger interior. Slide the cone retainer disc (compression washer) over the insulated conductor, with the beveled side toward the cone, until it contacts the cone (see Figure 2)
STEP 11
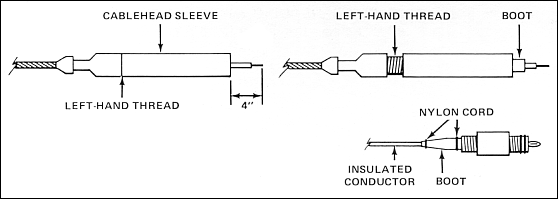
While holding the stinger, thread the cablehead sleeve (body) over the insulated conductor and screw it into the stinger until hand tight; note that these parts have left hand threads. Cut the insulated conductor off four inches from the end of the cablehead sleeve and remove one inch of insulation from the conductor. Slide a rubber insulating boot over the insulated conductor (see Figure 3).
STEP 12
Insert the bare cable conductor into the hole in the brass terminal nut of the contact (teardrop) sub assembly and twist to secure (some versions have a set screw to secure the wire).
STEP 13
Slide the rubber insulating boot over the brass terminal nut and secure the boot at both ends with nylon seizing cord (see Figure 3); dental floss tape has been used in a pinch. Two separate ties at each end is a good idea as is melting the loose ends and a little of the knot with a soldering iron to prevent loosening. Never use black vinyl electrical tape in place of a proper rubber insulating boot, but premium tapes have been used in an emergency situation (rubber and FEP tapes).
|
|
|
|
|
|
|
|
|
 |
|
|
|
|
|
|
|
|
FIGURE 4
STEP 14
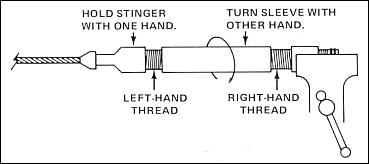
Hold the stinger with one hand and "back off" the sleeve with the other hand until only one thread holds them together (remember this is a left hand thread). Rotate the contact (teardrop) sub to the left (counterclockwise) about one turn, then screw it into the sleeve one full turn; these parts have normal right hand threads. Clamp the contact (teardrop) sub assembly in the vise, and while holding the stinger in one hand, screw the sleeve onto the contact (teardrop) sub assembly. During this process, the sleeve will also be screwing into the stinger because of the opposite rotation of the two sets of threads (logging people are so clever).
STEP 15
Using an 18 inch pipe wrench, tighten the sleeve onto the contact (teardrop) sub assembly. Reverse the cablehead in the bench vise so that the stinger is clamped in the vise. Using the 18 inch pipe wrench again, tighten the sleeve into the stinger, remembering this is a left hand thread.
STEP 16
Check the cablehead and the cable for continuity and/or short circuits.
NOTE:
Babbitt cableheads are headed onto a cable in the same manner except that the Babbitt stinger and cone sleeve screwed together will be referred to as the "stinger" in the foregoing instructions.
|
Home | Tech & Tips | Downhole Hardware |
06-05-00
Last 10-20-10
|
|
|
|
|